Once popular in the 70s, the macrame nowadays are brought back by the boho chic enthusiasts. We’re not surprised to see an increase of chic macrame hanging chairs out there due to its stylish and modern versatility. They are simply beautiful but so pricey!

If you have been looking for one for your living room or porch, the bohemian macrame swing chair in the picture above is now available on amazon. But if you ask your self- how to make a macrame hanging chair – you should definitely give this a try.
Contents
1 – DIY a Gorgeous Boho Macrame Chair with Hardwood dowels
Supplies Needed:
- 3 1 1/4-inch hardwood dowels, 30-inches long (available here)
- 2 5/8-inch hardwood dowels, 36-inches long (available here)
- 200 yards, 1/4-inch macrame cord or rope (available here)
- 8 yards, 1/2-inch rope (here)
- 4 1-inch wood screws (here)
- Drill and 5/8-inch bit
- Measuring tape
- Scissors
- hanging kit
How to do it? Let’s have a look at the great step by step video tutorial by TheSorryGirls below:
2 – Macrame Hammock Chair Classic DIY

These free macrame patterns by AcajouCrafts are suitable for beginners since they are not complicated and pretty easy to make. Having said that, a comfortable hanging hammock chair is quite large and therefore is a DIY macrame hammock chair time-consuming project. And this one is really comfy you can hang indoors and outdoors.
In contrast to other macrame chairs you can find online, this one has a deep “pocket” so you can nestle in and swing away all the stress. The size of the seat is approximately 40 inches long and 32 inches wide but you can increase the width cutting additional cords. Make sure you end up with an even number (36, 38, 40, etc.)
Supplies Needed:
- 6mm cord material (322 yards)
- Two 3-inch welded metal rings (heavy-duty)
- Flexible Tape Measure
- Optional: One 36-inch wooden Dowel, 3/4-inch thick (+ dowel caps)
Knots used:
- Double Half Hitch (DHH)
- Alternating Square Knots (ASK)
- Barrel Knot
- Larks Head Knot
- Wrapped Knot
- Overhand Knot
Cut the cords as follows:
- Upper Side Supports –16 cords, each at least 3 yards long
- Lower Side Supports –16 cords, each at least 4 yards long
- Seat — 32 cords, each at least 6.5 yards long
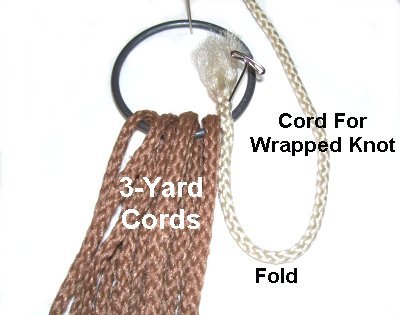
- Wrapped Knots — 2 cords, each 36 inches long
Note: The images below mimic the details of each step, but in a smaller scale.
When you create your own Hammock Chair, the cords will be thicker and there will be more of them.
Side Supports
Step 1: Pass 8 of the 4-yard cords through one of the rings, and match the ends.
Place 8 of the 3-yard cords on top, and center them as well.
Fold the bundle of cords over the lower part of the ring.
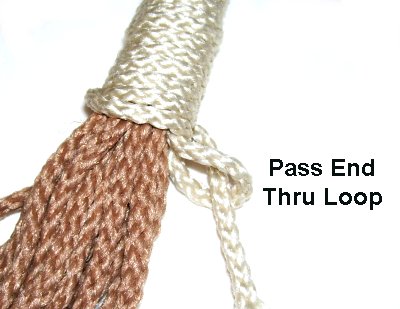
Tie a Wrapped Knot around the cords, following the instructions below:

Wrap firmly, moving downward, towards the fold.

Upper Edge of Seat
Step 3: Secure the rings to your work surface or hang them up somehow.
Select two of the shortest cords coming from the right ring, and two more from the left.
These will act as holding cords for the upper edge of the Hammock Chair.
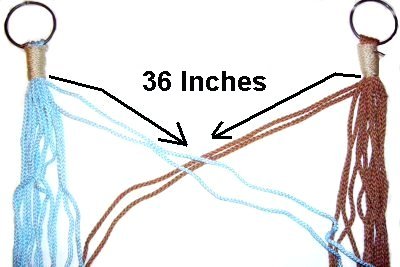
The four cords should be brought towards each other, diagonally, so they unite at this point.

Use them to tie a tight Square Knot. The working cords are 1 and 4 and the fillers are 2 – 3.

You will be mounting the cords for the seat of the Hammock Chair on either side of this knot.
Creating the Seat
Step 5: Move the ends of the 4 cords so two go right, and the other two head left, rather than letting them dangle. You can see this in the image below.
The cords for the seat of the Hammock Chair will be mounted onto the 4 cords.
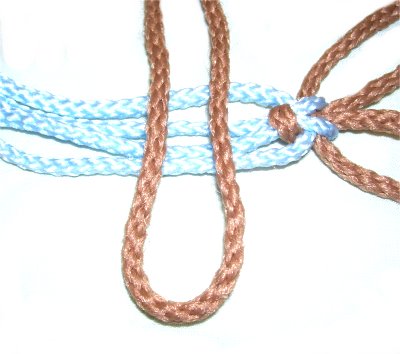
Leave some room between this knot and the Square knot, for the next step.

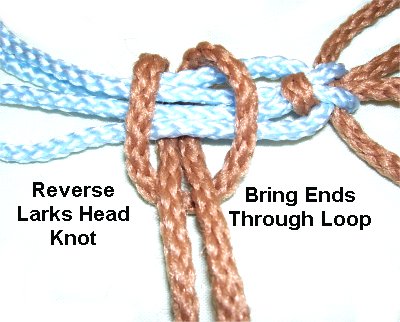
Pass the end over the front, and under the back of the cords. Bring it over the cord you are working with, as you pull it downward.


Repeat step 5 with the remaining 6.5-yard cords. There should be 16 cords mounted on each side of the SK in the center of the Hammock Chair.
Step 6: Tie the first row of Alternating Square Knots (ASK) with the 6.5-yard cords. Start with cord 1 and move all the way across to cord 64, tying the knots in a horizontal row.
They should rest just below the mounting knots described above. Use 4 cords per knot (2 fillers). Tie the knots firmly and tighten them as much as you can.
Step 7: Tie more rows of ASK, so there is 1-inch of space between the rows.
The EVEN numbered rows begin with cord 3 and end with cord 62.
The ODD numbered rows begin with cord 1 and end with cord 64 (same as row1).
Stop when you have around 10 inches of material left, by measuring the shortest cords.
Lower Edge of Seat
Step 8: Hang the Hammock Chair by the rings, if you have not already done so.
Select two of the longest cords coming from the right ring, and two more from the left. Move all four of these cords diagonally, towards each other. Measure 60 inches down from the Wrapped knot. That’s the point where the cords should unite.
IMPORTANT: Before you move on to the next step, place the bottom of the seat close to these holding cords, to check the depth of the Hammock Chair.
The bottom portion of the seat needs to form a deep pocket, as in the image shown at the top of the page. You can reduce the distance between the Wrapped knot and the place where the cords meet, if you want the bottom edge to come up more.
Don’t bring it up too much, or the seat won’t be comfortable.
Step 9: Once these lower holding cords are at the correct placement, tie a tight Square Knot to link them together. This is similar to what you did in step 3.
Step 10: Move the ends of the new holding cords so two go right, and the other two head left, rather than letting them dangle. Attach half the cords from the seat to the right of the Square Knot, and the same on the left, using Double Half Hitches.
Design Tip: This is the same as step 5, only the type of knot used is slightly different. Start near the center and move outward as you attach the cords.
Apply glue to the entire row of DHH and allow it to dry before continuing.
Tie a Barrel Knot with each cord, resting under the seat of the Hammock Chair, close to the lower edge.
Finish the seat by choosing one option:
- (Option 1) Weave the ends through spaces in the seat. You can trim them a bit first, but make sure they are at least 2 inches long. Use glue to hold the ends in place.
- (Option 2) Trim the cords and leave a fringe, so they dangle.
Side Supports
Step 11: Organize the remaining cords for the right side support, into sets of two.
You will move from the bottom to the top of the Hammock Chair as you attach them to the right side of the seat design. Look at the seat, and notice that there are large spaces along the edge, between the rows of Square Knots.

Make sure the portion coming from the ring is straight, with a little tension.

After tightening it, make sure it rests in the back of the Hammock chair design.

Step 12: Repeat step 11 with the remaining side supports for the right side. Use the longest cords first, since they should support the lower half of the seat. Make sure they are evenly spaced. The shorter cords are used as you move closer to the top.
Step 13: Repeat steps 11 and 12, attaching the left side supports. Try to place them between the same rows as on the right side. Make adjustments to the knots as needed so the Hammock Chair hangs evenly, before moving on to the next step.

Do this to all the other side supports on both the right and left sides. When you are finished, apply glue to the knots and allow it to dry before moving on.
Step 15: The remaining material from the side supports can be used to make a fringe. You could also finish them off by attaching them to the seat with additional knots. Another option is to tie Barrel knots in each one, so they rest close to the Square knots. Apply glue and cut off the extra material.
Step 16: Use chain or thick rope passed through the rings to attach the Hammock Chair to a branch or sturdy hook.
Optional Attachment to a Dowel
Step 17: Using a dowel is optional, but it stabilizes the chair and makes it feel more sturdy.
- Drill holes at each end for the chain or rope to pass through.
- Slide the rings onto the dowel, and position them close to the holes.
- Use pieces of scrap cord to wrap around the rings and the dowel several times, to hold them in place.
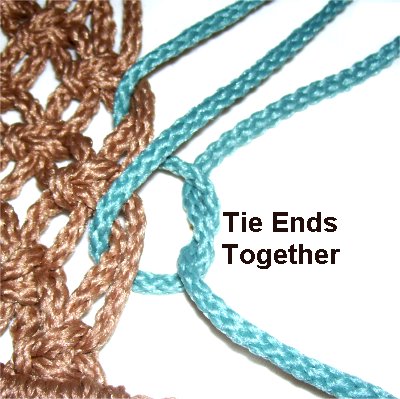
- You can wrap in a Figure 8 pattern, and when you are finished, tie the two ends together with a Barrel Knot.
- Make sure the knots are as tight as possible and apply glue. Attach dowel caps at each end.
We highly recommend visiting the author of this lovely tutorial: Free Macrame Patterns, where you can find over 300 pages of instructions and photos to help you create a variety of modern and vintage projects, including handcrafted jewelry.
Read more:
- REVIEW: Macrame Hammock Swing Chair by Sorbus
- Review: Stylish Macrame Hanging Chair by Hang A Hammock Collective
- Review: Komorebi Hammock Chair Collection


