
Categories: DIY, Wood, Interior Design
Skills: moderate
Costs: little to nothing
Duration: one day
What: swing bench, swinging couch, wooden hanging bench, a wooden hanging sofa, hanging bench seat, rocking bench.
This rocking sofa lets your day end comfortably. And it looks so beautiful in its simplicity. It’s not difficult to do it yourself. Try it out!


You will need this material:
- 2 swing hooks for suspension
- Ropes for suspension (length depends on room height)
- Various screws (various sizes and lengths)
- Wood (cutting list see step 1) for example bonanza or ash
- Soap
You will need these tools:
- Drilling machine
- Various drills (including artificial drills)
- Cordless screwdriver
- File
- Slicer
- Mallet
- Brush
- Screw clamp
- Orbital sander
- Chisel
- Jigsaw
This is how you do it:
- Cutting
The wood should either be cut to size in a hardware store or by a carpenter around the corner: You will need: 5 pcs. 3 x 20 x 140 cm (seating surface and backrest); 2 pcs. 3 x 15 x 70 cm (crosswise wood for seating surface); 1 pc. 10 x 15 x 55 cm (for 2 supports, angled); 2 pcs. 2 x 10 x 45 cm (supports
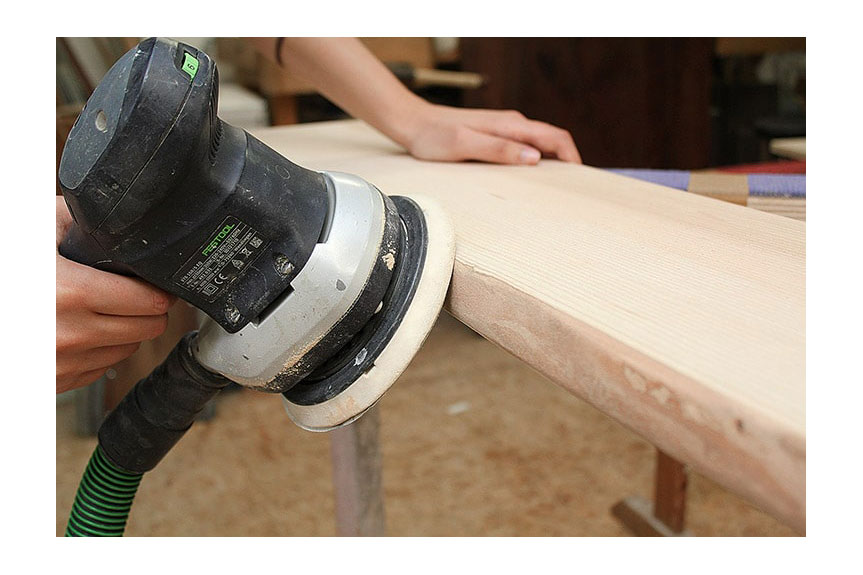
- Wood finishing A
First of all, the boards have to be smoothed and sanded. Use the orbital sander to work on the top and bottom surfaces (except for the seat underneath) and all of the edges. Only on the boards that abut (seat and backrest), the edges are not rounded.

- Wood finishing B
We have decided to retain the contour of the bark edge. For this we use a chisel and a wooden hammer to push off the bark. After that, the bark is also sanded until it is smooth and round.

- Supports for the backrest A
Assembling a backrest is easier than you would think. First, you make a stencil

- Supports for the backrest B
Draw the stencil twice on the square wood. Afterward cut the supports with the jigsaw and plane and polish them smoothly. You have the most difficult part of the job behind you!

- Supports for the backrest C
You need these four parts to build the two supports for the backrest.

- Supports for the backrest D
It is important: The two parts per support need to be glued exactly aligned. So: measure, glue, screw, press.
- Supports for the backrest E
The screws are unscrewed out again once the glue has been dried. Now the supports for the back support are finished.
- Seat area A
We find it better if we leave a gap between the boards. To provide an equal spacing throughout, we put a spacer with a 7 mm thickness between the boards.
- Seat area B
The seat surface lies now with the rough sides upwards. Screw the seat boards this way. The crosswise running board will later also be used as suspension. It stands over about 10 cm.
- Backrest A
To fix the supports for the backrest, screw them once from the bottom and from the back of the Swing. This provides an optimal load distribution.
- Backrest B
Afterwards you will position the boards for the backrest. Also remember the spacers. Once everything is set, secure the two backrest boards with a clamp and then screw them to the uprights from FRONT. Fast finished.
- Soaps
Wood can be oiled, varnished, but also soaped. This is an interesting method of impregnation. Just fill it with soapy water, let it dry, sand it again and soap it a second time. Tip: If the wood is briefly wetted before the first soap or dipped briefly into water, the wood fibres will stand up and the soapy water can be soaked in more easily. (Note: There is soapy water in natural and in white. White soapy water brings a white shimmer to the wood).
- Ropes
These ropes here are actually being used by boat owners. Just fine for us! Just thread it through, tie a knot and you’re done.

- Suspension
You can either hang up your new hanging bench on four strings, using hooks, or on two strings. Be sure to consult a professional for help. The hooks must be fixed to the ceiling securely. The hanging bench itself has a high own weight, plus two grown-ups, so you can easily reach 200 kg.


Now sit down and push off carefully!

The project is originally made by Handmadekultur. Photos: Heiko Seibel
Don’t wanna drill holes in your ceiling? Here you can find: The 7 Best Patio Swing Stands
Like DIY Projects? Here is DIY- How To Make A Wooden Hammock Chair Stand